CentOS7 安装 Nginx 及 配置
- Linux
- 2021-05-18
- 114热度
- 0评论
1、查看 gcc 版本,安装 Nginx 需要先将官网下载的源码进行编译,编译依赖 gcc 环境,如果没有 gcc 环境,则需要安装。
# 查看 gcc 版本
gcc -v
# 安装 gcc
yum -y install gcc
2、安装 pcre、pcre-devel,PCRE(Perl Compatible Regular Expressions) 是一个Perl库,包括 perl 兼容的正则表达式库。Nginx 的 http 模块使用 pcre 来解析正则表达式,所以需要在 Linux 上安装 pcre 库,pcre-devel 是使用 pcre 开发的一个二次开发库。Nginx 也需要此库。
yum install -y pcre pcre-devel
#查看 pcre 版本
pcre-config --version
3、安装 openssl,openssl 是 web安全通信的基石,没有 openssl,可以说我们的信息都是在裸奔。OpenSSL 是一个强大的安全套接字层密码库,囊括主要的密码算法、常用的密钥和证书封装管理功能及 SSL 协议,并提供丰富的应用程序供测试或其它目的使用。
nginx 不仅支持 http 协议,还支持 https(即在ssl协议上传输http),所以需要在 Linux 安装 OpenSSL 库。
yum install -y openssl openssl-devel
4、安装 zlib
zlib 库提供了很多种压缩和解压缩的方式,Nginx 使用 zlib 对 http 包的内容进行 gzip ,所以需要在 Linux 上安装 zlib 库。
yum install -y zlib zlib-devel
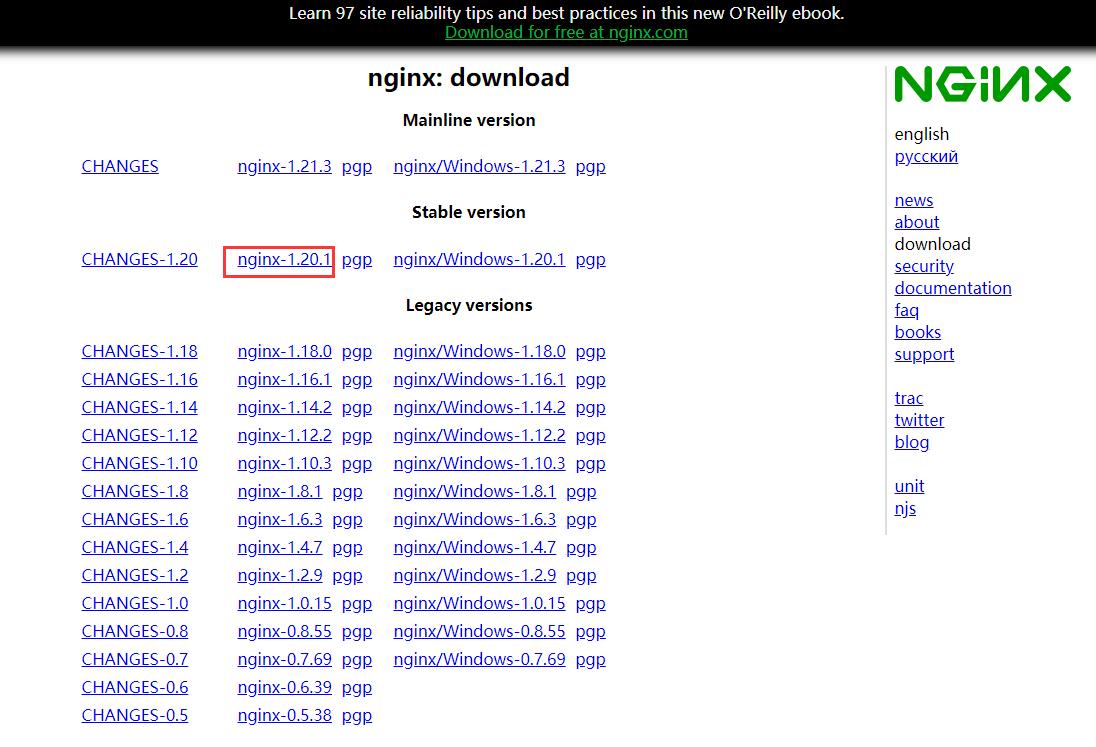
5、下载 Nginx 安装包
使用 wget 命令下载(推荐)。确保系统已经安装了 wget,如果没有安装,执行 yum install wget 安装。
cd /usr/local
wget -c http://nginx.org/download/nginx-1.20.1.tar.gz
6、解压
tar -zxvf nginx-1.20.1.tar.gz
7、进入 nginx-1.20.1 目录
cd /usr/local/nginx-1.20.1
8、编译、安装
# Nginx 默认安装的时候没有加载 stream 模块,通过添加 --with-stream 参数指定安装 stream 模块。如果不安装后面使用 stream 时会报错:unknown directive "stream" in /usr/local/nginx/conf/nginx.conf:5
./configure --with-stream
make
make install
whereis nginx #查找安装路径
9、启动 nginx 服务
cd /usr/local/nginx/sbin
./nginx
Nginx 其他命令:
# 检查配置文件 nginx.conf 的正确性
./nginx -t
# 启动 nginx
./nginx
# 重新载入配置文件
./nginx -s reload
# 重启 Nginx
./nginx -s reopen
# 停止 Nginx
./nginx -s stop # 先查出nginx进程id再使用kill命令强制杀掉进程。
./nginx -s quit # 待nginx进程处理任务完毕进行停止。
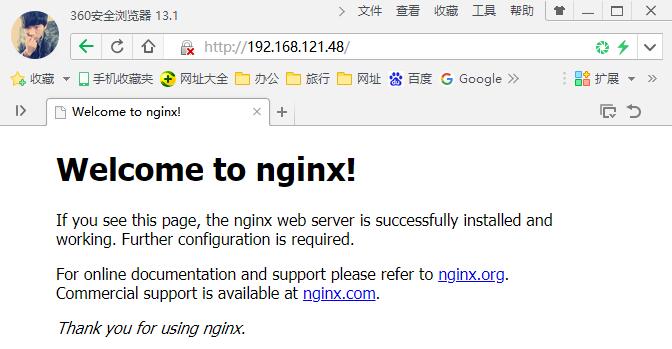
10、查看 nginx 服务是否启动成功
ps -ef | grep nginx
11、访问 http://ip:80
12、开机自启动,在 rc.local 增加启动代码:
vim /etc/rc.local
增加一行 /usr/local/nginx/sbin/nginx
设置执行权限:
chmod 755 rc.local
总结:目前能实现端口转发的工具大致有:rinetd、SSH、iptables、nginx、haproxy,其中rinetd配置最为简单,但不支持UDP转发,并且该软件已经好几年未更新,如果您服务器上已经安装了nginx,不妨用nginx做端口转发。
扩展:自定义配置文件:
worker_processes 1;
events {
worker_connections 1024;
}
http {
include mime.types;
default_type application/octet-stream;
sendfile on;
keepalive_timeout 65;
server {
listen 5432;
server_name localhost;
location / {
proxy_pass http://192.168.1.200/media/?action=stream;
proxy_set_header Authorization "Basic AAAAAAAAAAAAAAA==";
}
}
}
stream {
# 可以创建配置文件夹,统一放置,方便管理
# include myConf/*.conf;
#将tcp9004端口转发到124.128.64.179的8081端口
server {
listen 9004;
proxy_connect_timeout 8s;
proxy_timeout 24h;
proxy_pass 124.128.64.179:8081;
}
#将udp53端口转发到192.168.1.100的53端口(注:Windows下的Nginx不支持UDP代理功能)
server {
listen 53 udp reuseport;
proxy_timeout 20s;
proxy_pass 192.168.1.100:53;
}
#ipv4转发到ipv6
server {
listen 9135;
proxy_connect_timeout 10s;
proxy_timeout 30s;
#IPV6的IP需要使用[]括起来
proxy_pass [2607:fcd0:107:3cc::1]:9135;
}
}

 鲁ICP备19063141号
 鲁公网安备 37010302000824号